Love by Chocolate Pie
I don’t know about you, but I really think the phrase “death by chocolate” is really unsuitable for one of the most lovable foods out there. I mean, chocolate is almost always associated with bliss, romance, and of course, love.
Like I do from time to time, I became quite curious about this ingredient that has held the key to our hearts for so many years. This ingredient, which when used appropriately, can calm the most cry-ingest of babies and broken-hearted souls alike.
Where did it all start?
Well, it might come as little surprise that this sultry ingredient comes from a place in the world with a magnificent history full of mysticism and passion. Central and Latin America was home to the first cacao trees that thrive in lush tropical forests. In fact, cacao was to the ancient Olmecs, Mayans, and Aztecs what good tea was to the ancient Chinese, an ingredient that was fit for the gods with its unique stimulating properties. It was the center of ceremonies and celebrations, of worldly union and uniting with the after-life.
In fact, in the days of the Aztec ritual of sacrificing humans, some of those unlucky chosen ones would even be fed a gourd of chocolate before the ritual. Talk about death by chocolate. I mean, thanks but no thanks.
Well, times have changed, and I’m all about the love baby, especially if it’s plant-based, and there is nothing my husband loves quite as much as chocolate. My kids, it seems, have inherited his love for chocolate, with our youngest doing just about anything to get a taste of “choc-et” as he adorably calls it.
This Love by Chocolate Pie is so easy to make, yet looks amazing! It’s one of those dishes that will make everyone oooh and ahhh and you can soak in all of that glory without ever having to break a sweat. Also, you will be eating a lot of chocolate while making it, so you really cannot go wrong here.
Ingredients:
- 6-8 strawberries that are around the same size, washed and dried
For the Base-
- 1 C pumpkin seeds (that’s 12g of protein ya’ll!)
- 1 C instant oats
- 3/4 C dates (I don’t use medjool, just the ones you can find at the local markets)
- 1/4 tsp salt
For the Filling-
- 400g dark chocolate (make sure it’s vegan), broken into chunks
- 1 C coconut milk (room temperature)
- 1/4-1/3 C pure maple syrup
- 1 tsp vanilla extract
- 1/2 tsp salt
Optional Toppings-
- toasted coconut chips
- dried rose petals
Directions:
- De-pit and soak the dates in hot water for 10 minutes.
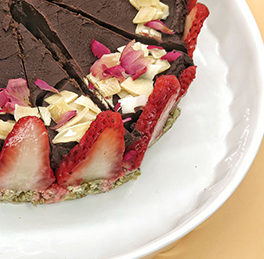
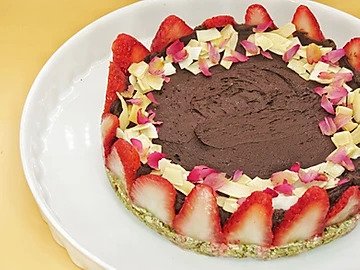
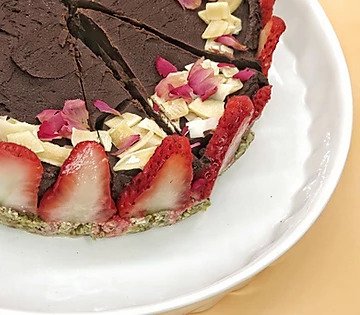
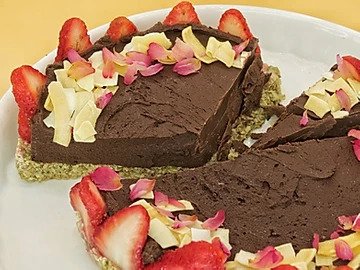
- While the dates are soaking, prepare the strawberries. Cut off the stems, and then thinly slice off two of the sides. Then cut the leftover middle piece of strawberry into two slices so that you have two thicker slices (see photo to see what the heck I am talking about). Set aside.
- Add dates, pumpkin seeds, oats, salt and vanilla to a food processor and process until mixture begins to bind together, scraping down as needed.
- Line the bottom of a springform pan with baking paper (cutting it down a bit with scissors is a good idea, as it will look prettier once removed from the pan) and add the mixture from the food processor. Spread onto the bottom of the pan, pressing down with a spatula to make sure the whole bottom is evenly covered.
- Place the strawberries top side up around the base, with the flat side facing out, against the perimeter of the pan. Continue to place around until there is a crown of strawberries on top of the base. Place in the refrigerator to chill while you prepare the filling.
- Add the chocolate to a large glass bowl. Microwave for 2 minutes. Remove from microwave and stir. Put back in the microwave in 1 minute increments, stirring after each time. Make sure not to over-cook. You can also use the double-boiler method on the stovetop if you prefer. Once chocolate melted to a silky smooth consistency, add the maple syrup, vanilla, and salt. Mix thoroughly. Add the coconut milk last, pouring and stirring at the same time. The mixture will become thick quickly, and that’s totally normal.
- Once mixture is well combined and smooth, take the pan out of the refrigerator and pour the mixture into the pan, smoothing the top with a spatula.
- Put pan into the refrigerator (as long as it’s pretty cold) and let set for 2 hours or more. You can also freeze it, but it needs about 30 minutes of sitting out before it’s ready to slice.
- If desired, add additional toppings around the edge of the pie before slicing.
Enjoy the love!
Share This Story, Choose Your Platform!